Monday, December 21, 2015

Display jquery dialog in parent window

The example below is a simple way to display a dialog in the parent window from an iframe.
  • Include jquery and jqueryui into your parent window
  • After this you can access to the parent JQuery object within iframe
   <script type="text/javascript">
         $(document).on("click", "[id*=btnShowPopup]", function () {
            var $jParent = window.parent.jQuery.noConflict();
            var dlg1 = $jParent('#editGiveawayDialog');
              dlg1.dialog({
               title: "Display Dialog",
               width: 550,
               height: 300,
               zIndex: 10000,
                 buttons: {
                   Ok: function () {
                     dlg1.dialog('close');
                   },
                   Cancel: function () {
                     dlg1.dialog('close');
                   }
                  },
                   modal: true
               });
               return false;
           });
            </script>

Hope this helps! :)

Sunday, November 29, 2015

CS0122: 'System.Configuration.StringUtil' is inaccessible due to its protection level

In Visual Studio

File - Open - Website
GoTo: C:\Windows\Microsoft.NET\Framework\v4.0.30319\ASP.NETWebAdminFiles
Open
Now open App_Code\WebAdminPage.cs
GoTo Line 989
Comment out the current text and paste
string appId = (String.Concat(appPath, appPhysPath).GetHashCode()).ToString("x", CultureInfo.InvariantCulture);


Simple Encryption and Decryption Class C#

For anyone looking for a simple encryption class using Rijndael algorithm, enjoy!
using System;
using System.Collections.Generic;
using System.Text;
using System.Security.Cryptography;
using System.IO;

public static class EncryptionUtils { public static byte[] GenerateKey() { RijndaelManaged provider = new RijndaelManaged(); provider.GenerateKey(); return provider.Key; } public static byte[] GenerateIV() { RijndaelManaged provider = new RijndaelManaged(); provider.GenerateIV(); return provider.IV; } public static string Decrypt(byte[] encryptedBytes, byte[] key, byte[] iv) { RijndaelManaged provider = new RijndaelManaged(); MemoryStream ms = new MemoryStream(); using (CryptoStream cryptoStream = new CryptoStream(ms, provider.CreateDecryptor(key, iv), CryptoStreamMode.Write)) { cryptoStream.Write(encryptedBytes, 0, encryptedBytes.Length); } return Encoding.UTF8.GetString(ms.ToArray()); } public static byte[] Encrypt(string value, byte[] key, byte[] iv) { RijndaelManaged provider = new RijndaelManaged(); byte[] valueBytes = Encoding.UTF8.GetBytes(value); MemoryStream ms = new MemoryStream(); using (CryptoStream cryptoStream = new CryptoStream(ms, provider.CreateEncryptor(key, iv), CryptoStreamMode.Write)) { cryptoStream.Write(valueBytes, 0, valueBytes.Length); } return ms.ToArray(); }

Saturday, October 10, 2015

Disable Search In Toolbar For Windows 10

If your like me and don't care to have a search bar directly adjacent to the Windows start menu button after installing Windows 10.  The steps below will show you how to remove it.


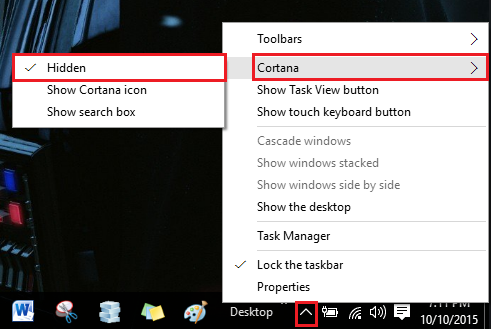
First, right-click on the up arrow as demonstrated in the snapshot below. Next, hover your mouse pointer over the "Search" (or "Cortana") option, then a submenu will appear.

Choose "Hidden" here to disable the taskbar search altogether, or select "Show icon" to reduce the search bar down to a small icon.Choose "Hidden" here to disable the taskbar search altogether, or select "Show icon" to reduce the search bar down to a small icon.


Congrats!!  You've removed the search bar.

Friday, July 10, 2015

Disable autocomplete in Chrome

Originally when I was given the task to disable autocomplete. I thought it would be no problem, but that was far from reality. I tried adding autocomplete="off" to the input tag but it continued to show in chrome. Although, it did seemed OK in IE and Firefox. After a few hours of frustration. I decided to use "false" as the value instead of "off" which resolved the issue. Below is a snippet of the working code. 


//Use this for IE
autocomplete="off"

//Use this for Chrome
autocomplete="false"


//Form Example
// You can also add it to the form so you won't need to add it individually.
<form id="form1">
<input id="txtName" type="text" autocomplete="false" />
<input id="txtEmail" type="text" autocomplete="false" />
<input id="btnSubmit" type="button" value="Submit" />
</form>

Change SA password in MSSQL 2008

USE Master
GO
ALTER LOGIN sa WITH PASSWORD = 'Set New Password'
GO
ALTER LOGIN sa WITH
      CHECK_POLICY = OFF,
      CHECK_EXPIRATION = OFF;


Handling Multiple JQuery Versions

Although I don't recommend it. If you've ever need to use multiple JQuery versions, then I hope this helps. I recently worked on a project that needed to use multiple JQuery plugins.


 <script type="text/javascript" src="http://ajax.googleapis.com/ajax/libs/jquery/1.9.1/jquery.min.js"></script>
 <script type="text/javascript" src="Scripts/simpleZoom.js"></script> 
<script type="text/javascript"> //Create new variable and set it to now conflict. var jQuery_1_9_1 = $.noConflict(true); //Now, anytime you use this version, you'll need to use this variable. $(function () { jQuery_1_9_1('#show').simpleZoom({ zoomBox: "#zoom", markSize: [120, 169], zoomSize: [240, 338], zoomImg: [480, 677] }); }); </script>

Saturday, January 10, 2015

Maintain JQuery Tab Active Position on PostBack C#

Recent, I decided to use the JQuery tabs in one of my projects.  I noticed really quickly that when I had a click event inside the tabs, it would return to the first tab.  Typically, you can use the AJAX UpdatePanel to handle partial PostBacks but in my case,  It wasn't updating correctly with other databound controls.  The snippet below will show you how to maintain your tabs on PostBack.


First, add your JQuery script tags in the head section.
<link href="../jquery-ui-1.11.1.custom/jquery-ui.min.css" rel="stylesheet"></link>
<script src="http://code.jquery.com/jquery-1.10.2.js"></script>
<script src="http://code.jquery.com/ui/1.11.2/jquery-ui.js"></script>
Next, add this script inside the header to initiate your tabs.
<script>
    $(function () {
        $("#tabs").tabs();
    });
</script>
Next, add this script function to the bottom of the page. This script will get the value from the hiddenfield control after PostBack.
 <script type="text/javascript">
        $(function () {
            $("#tabs").tabs({
                activate: function () {
                    var selectedTab = $('#tabs').tabs('option', 'active');
                    $("#<%= hdnSelectedTab.ClientID %>").val(selectedTab);
                },
                active: <%= hdnSelectedTab.Value %> + ""
            });
        });
    </script>
Next, add this hiddenfield control. This will be used to set the active tab when the PostBack occurs.
<asp:hiddenfield id="hdnSelectedTab" runat="server">
</asp:hiddenfield>
Finally, set the value of the hiddenfield control to the appropriate tab. To reset the value, set the value to 0 when the page is not a PostBack.
protected void btnCalShipping_Click(object sender, EventArgs e)
        {
            hdnSelectedTab.Value = "1";
        }

Monday, August 18, 2014

Accessing Network Users Email With LDAP

If your running an application on your personal or company network and it's using Windows Authentication, this snippet may be of some use.  This past weekend, I was at an event where I was given the task to create an application that allowed users in the network to register for a company event.  One of the many requirements was to send a confirmation email once the registration was complete.  Since this application would be used on our company network, I decided to use WindowsIdentity and DirectoryServices in the .Net framework.

In the snippet below, I will show you how to access the current users email address.  As you begin to explore the Active Directory, remember that "mail" is only one of many attributes that you can accessed through LDAP.  For more, go here.  Happy Coding!! :)


You'll need to reference DirectoryServices in your project.
using System.DirectoryServices;
using System.Security.Principal;
 
public static string DisplayEmail(IIdentity id)
 {
    string email = string.Empty;
    var winId = id as WindowsIdentity;
     if (id == null)
      {
        return "Identity is not a windows identity";
      }

    var userInQuestion = winId.Name.Split('\\')[1];
    var myDomain = winId.Name.Split('\\')[0];

    var entry = new DirectoryEntry("LDAP://" + myDomain);

    var adSearcher = new DirectorySearcher(entry)
      {
       SearchScope = SearchScope.Subtree,
       Filter = "(&(objectClass=user)(samaccountname=" + userInQuestion + "))"
      };

    var userObject = adSearcher.FindOne();

    if (userObject != null)
      {
       email = string.Format("{0}", userObject.Properties["mail"][0]);
      }
       
       return email;
 }

Typically, I put functions like this in my Utility class but you can put it where ever you see fit. Below is an example of how to execute this function.
 
var email = Utility.DisplayUser(WindowsIdentity.GetCurrent());


Retrieve OS version with Javascript

Recently, I was given a task to find out what OS version an end users machine was running on.  The reason I need this information was to check if the user should be running the application on IE9 32bit or IE9 64bit.  Now, this might not sound very useful but given the environment I was working in, the end user could be having an awkword experience.

 
 <script type="text/javascript">
      function checkOSVersion() {
        if (navigator.userAgent.indexOf("WOW64") != -1 || navigator.userAgent.indexOf("Win64") != -1) 
           {
             alert("This is a 64 bit OS");
           } 
        else 
            {
                alert("Not a 64 bit OS");
            }
           }
    </script>

Sunday, February 23, 2014

Using FileUpload with JQuery Mobile

One of the more irritating situations I've come across with JQuery Mobile is using ASP.FileUpload control. Whenever you hit submit to upload a file, the FileUpload control doesn't get the file. Basically, you end up with an empty string when it tries to save. I finally was able to figure it out after doing some digging around in the JQuery Mobile API. The below example shows what needs to be set to allow the FileUpload control to work.


In order to allow your FileUpload control work, you'll need to set data-ajax="false" where ever your form tag is located.

 
<form data-ajax="false" id="form1" runat="server">
</form>

Saturday, February 1, 2014

Binding returned data from an Ajax call to a Gridview

First, I have to say this was one of my most frustrating functions I've ever created. The biggest problem I faced was trying to get the data from the Ajax call to bind to the Gridview. As you'll see in this example, once the data returns, I loop through the xml and append a table row to the Gridview.


You'll need the JQuery reference in the head section.

 <script src ="http://ajax.googleapis.com/ajax/libs/jquery/1.3/jquery.min.js" type ="text/javascript">

For this first function you'll need to change the url in the ajax call to either the page your creating the Ajax call or the page your getting the post from which can also be a web service or handler. Then don't forget to set the method name after the page or web service your calling.

 function Button1_onclick() {
    $.ajax({
            type: "POST",
            data: '{}',
            contentType: "application/json; charset=utf-8",
            url: "AjaxTest.aspx/GetTransactionData",
            dataType: "xml",
            success: OnSuccess,
            error: function (XMLHttpRequest, textStatus, errorThrown) {
              $("#errmsg").ajaxError(function (event, request, settings) {
              $(this).append("<li>Error requesting page " + settings.url + "</li>");
           });
         }
      });
           return false;
    }

The next function will loop through the returned xml and append a table row for each row found in the xml to the Gridview.

 function OnSuccess(xml) {
   debugger;
    try {
         $(xml).find('Table1').each(function () {
          var id_text = $(this).find('ID').text();
          var name_text = $(this).find('Description').text();

          $('#<%=GridView1.ClientID %>').append("<tr><td>" + id_text + "</td><td>" + id_text + "</td</tr>");
        });
        }
    catch (err) {
        var txt = "There was an error on this page.\n\n";
        txt += "Error description: " + err.description + "\n\n";
        txt += "Click OK to continue.\n\n";
        alert(txt);
       }
     }

Below is the form example used to initiate the ajax call.

 <input id="Button1" type="button" value="Get XML" onclick="return Button1_onclick()" />
            <asp:GridView ID="GridView1" runat="server"></asp:GridView>

Finally, this is where you'll fill the data that gets returned to the client side. You'll need to add a WebMethod to your ".CS" page then create your data table and fill it from either a direct database call or web service to return the xml. In the example below, I'm creating my initial data table columns in the Page_Load so that when the Ajax call returns, it knows what columns are mapped to the Gridview.

using System;
using System.Collections.Generic;
using System.Data;
using System.Linq;
using System.Web;
using System.Web.Script.Services;
using System.Web.Services;
using System.Web.UI;
using System.Web.UI.WebControls;
protected void Page_Load(object sender, EventArgs e)
    {
        DataTable table = new DataTable();
        table.Columns.Add("ID");
        table.Columns.Add("Description");
        table.Rows.Add();
        GridView1.DataSource = table;
        GridView1.DataBind();
    }

    [WebMethod]
    [ScriptMethod(ResponseFormat = ResponseFormat.Xml)]
    public static string GetTransactionData()
    {
        DataTable dt = new DataTable();
        dt.Columns.Add("ID");
        dt.Columns.Add("Description");

        dt.Rows.Add("1", "Description 1");
        dt.Rows.Add("2", "Description 2");
        dt.Rows.Add("3", "Description 3");
        dt.Rows.Add("4", "Description 4");
        dt.Rows.Add("5", "Description 5");

        DataSet m_dsDataSet = new DataSet("pageDataSet");

        m_dsDataSet.Tables.Add(dt);

        string strXml = m_dsDataSet.GetXml();
        return strXml;
    }

Monday, January 27, 2014

Binding Nested Detailsview in Gridview

protected void GridView1_RowDataBound(object sender, GridViewRowEventArgs e)
        {
            GridViewRow row = e.Row;

            // Make sure we aren't in header/footer rows
            if (row.DataItem == null)
            {
                return;
            }

            DetailsView dv = (DetailsView)row.FindControl("DetailsView1");

            List<[object]> aList = List<[object]>();

            if (e.Row.RowType == DataControlRowType.DataRow)
            {
                aList[e.Row.RowIndex].Name = aList[e.Row.RowIndex].Name;

                dv.DataSource = aList.Where(u => u.ID == Convert.ToInt32(aList[e.Row.RowIndex].Address)).ToList();
                dv.DataBind();
            }
        }

Wednesday, December 25, 2013

Using Htmlframe tag instead of Iframe tag

I recently was working on a project where I had to use an Iframe. This Iframe would get querystring parameters and pass it to the associated page in the Iframe. Now, if your using a standard .aspx page, you won't need this tip. This tip if for people that are using Iframes in their controls. Since controls use System.Web.UI.UserControl and not the standard System.Web.UI.Page that pages use. You won't be able to use the standard Iframe tag. Instead you'll need to use the server Iframe version. Before using this server tag, you'll need to add the snippet below to your web.config in the controls section. Then add the following snippet in your control. Hope this was helpful!  
 <controls>
      <add assembly="System.Web" namespace="System.Web.UI.HtmlControls"
tagprefix="asp"/>   </controls>

 <asp:HtmlIframe frameborder="0" height="650" id="myiframe" name="myiframe" runat="server" src="prefcontent.aspx" width="400">
</asp:HtmlIframe>

Monday, September 23, 2013

Converting WordPress from Windows to Apache Server Error

Recently I was working with a charity that had a WordPress site running on a Windows server.  The owner decided to change it to an Apache server.  After the conversion he noticed that none of his child pages where linking.  It displayed a very vague error which could have most people changing things they don't need to touch.  In the snippet below, you'll see the code that needs to be changed in your root .htaccess file.  You can basically copy the whole thing and paste it over what's currently in that file.  Happy Coding! ☺

 
# BEGIN WordPress
ErrorDocument 404 /index.php?error=404
RewriteEngine On
RewriteBase /
RewriteCond %{REQUEST_FILENAME} !-f
RewriteCond %{REQUEST_FILENAME} !-d
RewriteRule . /index.php [L]
# END WordPress

Monday, July 8, 2013

How to Send an Email With App Setting in Web Config File.

A few years ago I was thinking about converting some of my settings to be accessed in one place. The other day a happened to run across this example that displays exactly how I approached it back then.  The problem was, back then there wasn't the resources available like there are today.  This example is strait to the point and will get you on the right path.  You can also incorporate any additional settings like this example into your config file as well. CODE EXAMPLE
Happy Coding!!!! ☺

Monday, July 1, 2013

Creating a JQuery Alert for a Specific Date or Date Range

Recently, one of my clients needed an alert to display changes to one of their processes. They needed it to display every time a user visited the page until it reached a specific date. In the example below I've created a basic Javascript function that allows you to enter a start date, end date and return type. For example, after you've added your start and end date you want to either put in weeks, days, hours, minutes or seconds into the interval property. Next, create a JQUERY function that will call the datediff and display an alert dialog with the content you've assigned which in this case is a div that has an id of "alertDate".
//START HEAD SECTION
<link href="http://code.jquery.com/ui/1.10.3/themes/smoothness/jquery-ui.css" rel="stylesheet"></link>
<script src="http://code.jquery.com/jquery-1.9.1.js"></script>
<script src="http://code.jquery.com/ui/1.10.3/jquery-ui.js"></script>

<script>
function datediff(fromDate, toDate, interval) {
   var second = 1000, minute = second * 60, hour = minute * 60, 
   day = hour * 24,week = day * 7;
   fromDate = new Date(fromDate);
   toDate = new Date(toDate);
   var timediff = toDate - fromDate;
   if (isNaN(timediff)) return NaN;
   switch (interval) {
   case "years": return toDate.getFullYear() - fromDate.getFullYear();
   case "months": return ((toDate.getFullYear() * 12 + toDate.getMonth())
   -
   (fromDate.getFullYear() * 12 + fromDate.getMonth()));
   case "weeks": return Math.floor(timediff / week);
   case "days": return Math.floor(timediff / day);
   case "hours": return Math.floor(timediff / hour);
   case "minutes": return Math.floor(timediff / minute);
   case "seconds": return Math.floor(timediff / second);
   default: return undefined;
  }
 }

$(function () {
   var curDate = new Date();
   var alertDate = new Date();
   alertDate.setDate(alertDate.getDate() + 
   datediff(curDate, alertDate, 'days'));

    if (alertDate.toDateString() >= curDate.toDateString()) {
                
      $("#alertMsg").dialog({
      height: 500,
      width: 650,
      modal: true
    });
   }
});
</script>
//END HEAD SECTION

//START BODY SECTION
<div id="alertMsg" style="background-color: #f5fa64;" title="IMPORTANT NOTIFICATION!!">
<h2 style="font-size: 30px; margin: 0; text-align: center;">
ATTENTION!!</h2>
This is a custom alert that will continue to display until the current date time is greater or equal to 
            the current date time.
        </div>
//END BODY SECTION

Saturday, May 18, 2013

When to comment your code

The other day I was browsing through some of the organizations I follow on twitter when I stumbled across this post from Ardalis.com.  This is a great article for programmers just getting starting as well as season professionals.  It gives you a great insight about when its the proper time to add comments to your code.  I think there are times that programmers in general struggle with whether or not it's the proper time to comment code.  I believe the main reason maybe that most of us think we write clean code or our naming convention is second to none.  Personally, I try to only comment in complex situations where I absolutely need to describe a function or procedure to perhaps give myself or another programmer an idea so he/she knows what's going on.  The thing to remember is that, what makes since to you may not make since to the programmer that follows behind you.  Also, know one likes coming in on a project where every other line is commented or there are giant paragraphs that start with some thing like, "// Dear maintainer:".  On top of that, it's also extremely irritating at lease to me when there's code that was added three plus years old and the code itself is actually not in the project anymore.  Anyway, below is the link to the article, hope it helps you or anyone else needing some clarification or understanding when and/or where not to add comments into an application.  Happy coding!!!  Article Link

Friday, May 10, 2013

Locating IP Original Origin C#

I recently was trying to write a function that would allow me to trace an IP back to it's origin or at least return the city and state.  I didn't want to use Google API or any other type of fancy API.  After a few hours of R.N.D., I found a link to a generic site that's soul purpose is to grab your current location and return XML.  As I started to write my function to parse the XML.  I realized my typical way of parsing XML was having issues because of the way this sites XML tree was assembled.  After giving it some thought, I came to the conclusion that I needed to add a namespace manager to my XML document which is called XmlNamespaceManager.  In the example below you'll see my simple approach and how I was able to resolve this issue.  Hope this helps anyone having similar issues especially when it comes to consuming XML.  Happy Coding!!!
 private const string _hostIPUrl = "http://api.hostip.info/";

 public string GetLocation() 
  {
   WebClient client = new WebClient();
   Uri uri = new Uri(String.Format("{0}", _hostIPUrl));
   List location = new List();

   string xmlString = client.DownloadString(uri).ToString();

   XmlDocument doc = new XmlDocument();

   doc.LoadXml(xmlString);

   XmlNamespaceManager manager = new XmlNamespaceManager(doc.NameTable);
   manager.AddNamespace("gml", "http://www.opengis.net/gml");

   XmlNode cityLocation = doc.SelectSingleNode("//HostipLookupResultSet/" +
   "gml:featureMember/Hostip/gml:name/text()", manager);

   return cityLocation.Value;
  }